Single post pages are essential for displaying your content in a reader-friendly way. In this article, we’ll explore the various settings available for single post pages, from layout options to sidebar configurations, allowing you to customize how your content is presented. Whether you’re looking to adjust heading styles, feature images, or control sidebar behavior, these settings offer flexibility to match your design and functional needs.
Setup a Single Post Page & Introduce Its Setting Fields
In this guide, we’ll walk you through how to configure the single post page and introduce the essential settings available for customization.
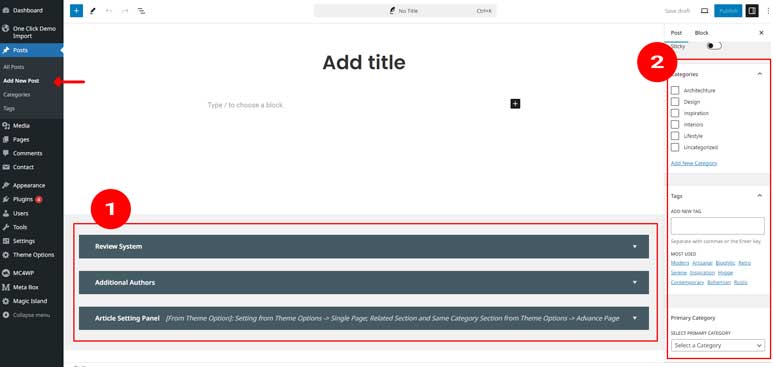
When creating a new post in WordPress using our theme, you’ll notice that there are two important field sections highlighted in red rectangles (as shown in the image above). These fields are critical for enhancing your post functionality and user experience. In this section, we’ll walk you through each of these options.
1. Article Review System
Our theme includes a built-in article review system that allows you to rate and review posts directly from the editor. This feature is especially useful for bloggers and review sites. We have a dedicated tutorial that covers this feature in-depth, including how to set it up and configure the review criteria. You can find the tutorial here.
2. Additional Authors
In some cases, your content may be co-authored by multiple people. To accommodate this, our theme includes an “Additional Authors” setting panel.
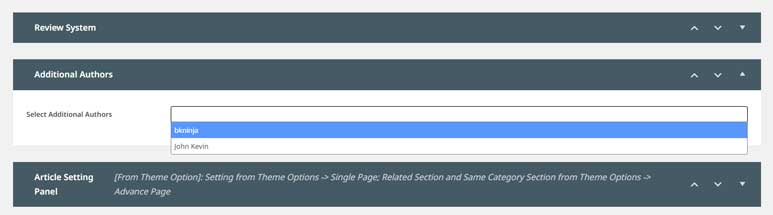
- Expanding the Panel: Click to expand the Additional Authors setting panel, as shown in the image above.
- Selecting Additional Authors: Within this panel, you’ll find a select field. When you click on it, a dropdown menu appears, listing all available authors registered on your site. Simply click on an author’s name to add them as a co-author for this article.
- Multiple Authors Selection: You can select more than one author by clicking additional names from the dropdown. Each selected author will be included as a contributor to the post.
- Author Display: Once you’ve selected additional authors, they will be displayed on the frontend of your post, alongside the primary author.
This feature is ideal for collaborative writing, ensuring all contributors receive recognition on published posts.
For more insight into how this feature looks and works, please visit the demo page here for your reference.
3. Article Setting Panel
The Article Setting Panel offers a range of customization options specific to each post. This panel provides flexibility in adjusting how individual articles are displayed and highlighted. Let’s explore the options available:
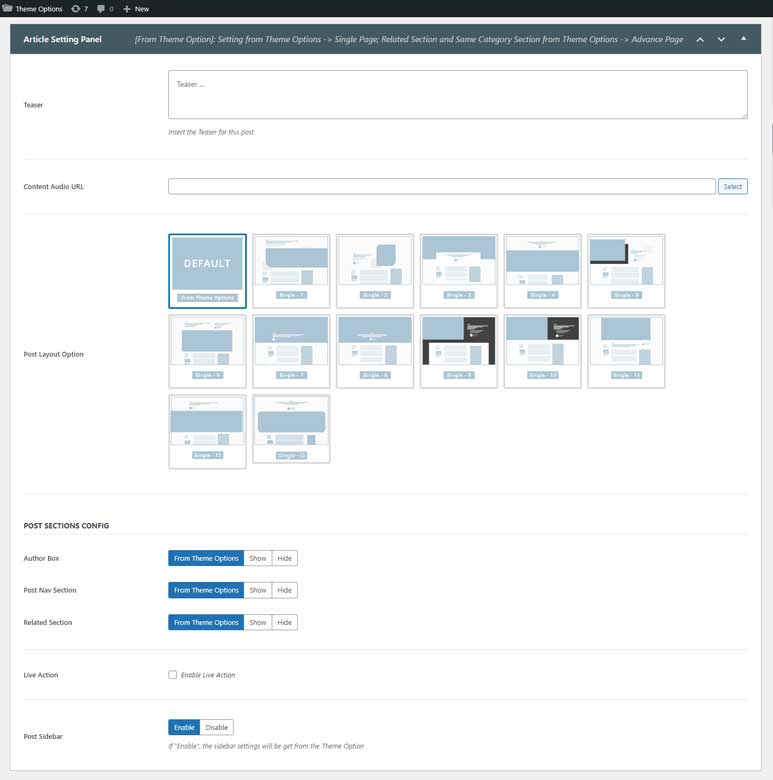
- Teaser:
The Teaser field is designed for displaying a short snippet or highlight of your post. This content is typically shown either above the main content or under the Post Title, depending on the chosen Post Layout. You can use this field to grab the reader’s attention with a compelling introduction or key insight, giving them a quick glimpse of what the article offers. - Content Audio URL:
This field is particularly useful if you want to attach audio content to your post, such as podcasts or narrated versions of your articles. Simply paste the URL of the audio file (e.g., MP3 link) here, and it will be integrated into your post with an audio player.
For more detailed information on how to use this feature effectively, please refer to this article. - Post Layout Option:
Choose the layout that best suits your content from the available options:- Default (From Theme Options): This option uses the layout defined in the Theme Options Setting (Global Option). It serves as the default setting when you create a new article.
- Other Options: There are 13 additional layout options available. These options provide different post layouts that you can apply specifically to this article. Once you select one of these layouts, it will override the Global Option and set the chosen layout for this post only.
For more detailed information, please refer to this article.
- Post Sections Config:
This section provides options to enable or disable specific post sections that appear after the main content. Let’s explore the configurations:- Author Box: This section showcases the author’s name, profile picture, and bio, along with links to their social profiles. Enabling this feature is ideal for building author credibility and reader connection.
Below is the setting key:- From Theme Option: This setting follows the global configuration defined in the Theme Options Setting panel.
- Show/Hide: Choosing “Show” will display the author box, while “Hide” will remove it from the post. Selecting either option will override the Global Option setting.
- Post Nav: This section displays links to the previous and next posts. It helps keep readers engaged by encouraging them to continue browsing related content.
Below is the setting key:- From Theme Option: This setting follows the global configuration defined in the Theme Options Setting panel.
- Show/Hide: Choosing “Show” will display the Post Nav, while “Hide” will remove it from the post. Selecting either option will override the Global Option setting.
- Related Section: This section helps keep readers engaged by displaying links to related posts at the end of the current article. This feature encourages further exploration of content by showing posts that are similar in topic or category.
Below is the setting key:- From Theme Option: This setting follows the global configuration defined in the Theme Options Setting panel.
- Show/Hide: Choosing “Show” will display the Related Section, while “Hide” will remove it from the post. Selecting either option will override the Global Option setting.
- Live Action: The Live Action feature indicates that a post is a live or ongoing article. When enabled, a “Live” button will be displayed, signaling to readers that the content is being updated in real-time. To update the live content, you will need a third-party plugin. There are some recommended plugins in this article for your reference.
For more detailed information on how to use this feature effectively, please refer to this article. - Post Sidebar: This option controls the visibility of the sidebar for a specific article.
Below is the Setting Key:- Show: Selecting this option will display the sidebar alongside your post content.
- Hide: Choosing this option will remove the sidebar and convert the article layout to a full-width format.
- Author Box: This section showcases the author’s name, profile picture, and bio, along with links to their social profiles. Enabling this feature is ideal for building author credibility and reader connection.
4. Primary Category
The Primary Category option allows you to designate the main category for your post, which helps in organizing and highlighting your content effectively. This feature is especially useful when your article is assigned to multiple categories.
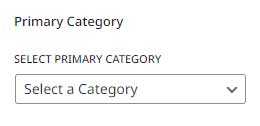
Setting Location:
- Classic Editor: You will find this option under the Category Selection section in the right sidebar of the editor.
- Gutenberg Editor: This option is located at the bottom of the right sidebar within the post settings.
Selecting a primary category ensures that your post is categorized appropriately and may affect how it is displayed on your site.
For more detailed information on how to use this feature effectively, please refer to this article.