Our Column Mega Menu makes navigation easier by organizing links into a clear, multi-level menu. Quickly access different categories and subcategories, making browsing more efficient and user-friendly. Upgrade your site’s navigation with the Mega Menu column for a better experience.
The Column Mega Menu feature is available exclusively for the Main Menu. Below, you will find a complete guide to setting up the Column Mega Menu in the Carbon Theme.
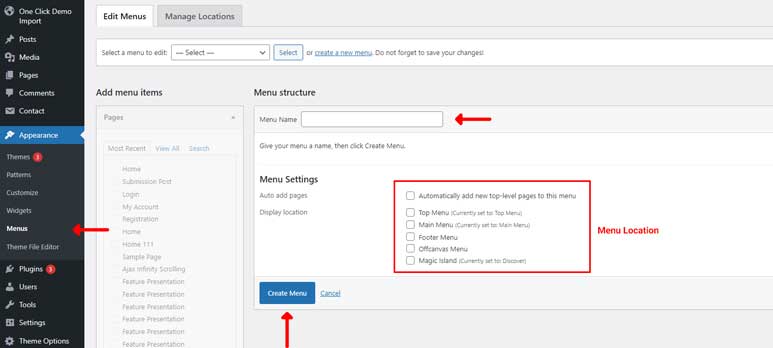
Step 1: Access the WordPress Dashboard
- Log in to your WordPress site.
- Navigate to Appearance > Menus.
Step 2: Create or Select the Main Menu
- If you haven’t created a menu yet, click on the Create a new menu link.
- Name your menu (e.g., Main Menu) and click the Create Menu button.
- Ensure the menu is assigned to the Main Menu location by checking the Main Menu box in Menu Settings and clicking Save Menu.
Step 3: Add Items to the Column Menu
- On the left side, you will see sections like Pages, Posts, Custom Links, and Categories.
- In this case, we are creating a Column Mega Menu, so we choose the Custom Links section to add the labels for the Column Menu as Menu Item Level 1.
- To create a column within this menu, choose the Custom Links section again to add the label for the column as Menu Item Level 2. Then, you can add any items from Pages, Posts, Custom Links, or Categories as Menu Item Level 3, representing the items in that column.
- To create additional columns, follow the same steps.
- Arrange the menu items by dragging them into your desired order. Sub-menu items can be created by dragging items slightly to the right under a parent item.
- Tick the checkbox labeled Enable Mega Menu.
- Once you’re done, save the menu, and you will see the results below.
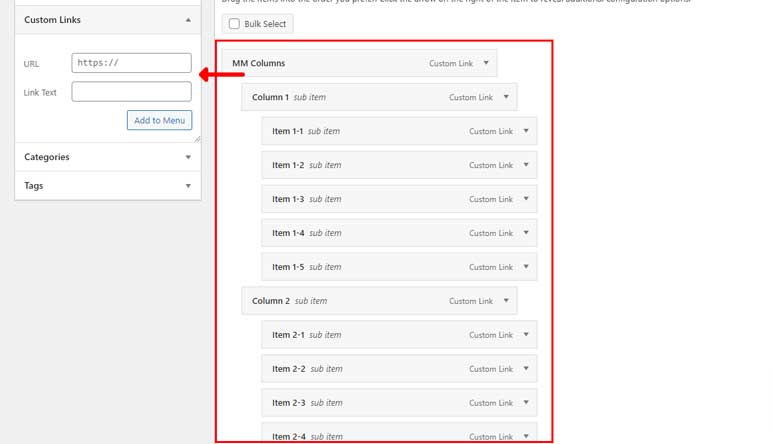
You can see the setting of the Column Mega Menu in the image above, and the resulting menu structure in the image below.
