This documentation provides step-by-step instructions on how to configure and use the ChatGPT integration within your WordPress theme.
Settings Overview
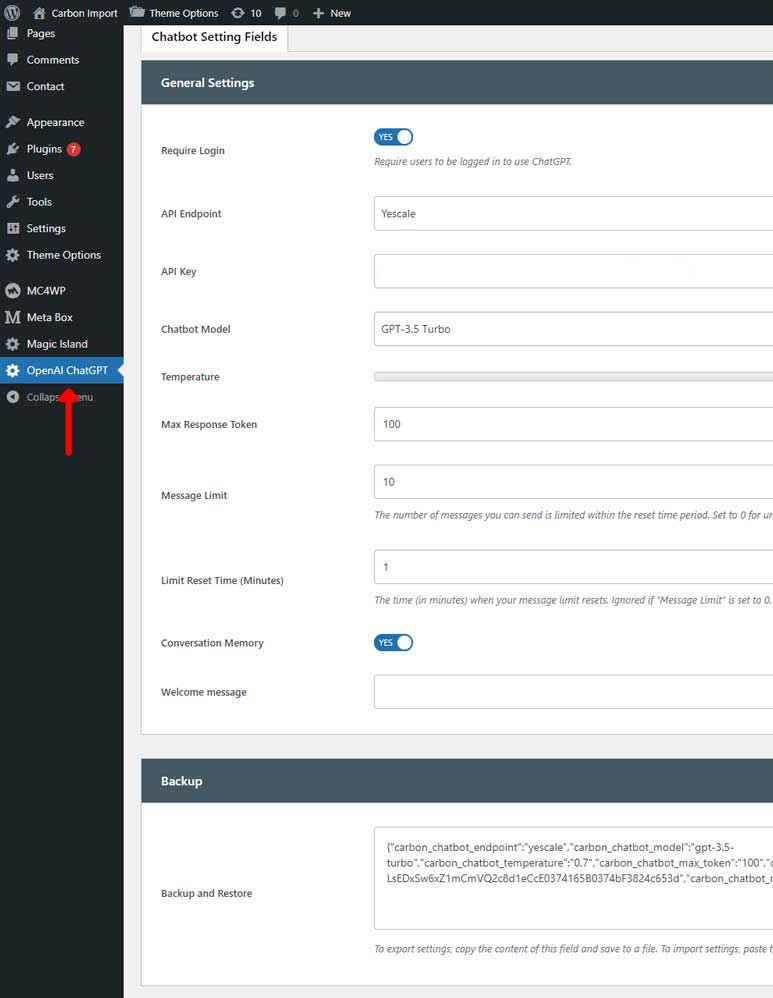
In the settings panel, you can customize how ChatGPT interacts with your users. Here’s a breakdown of each option available:
General Settings
- Require Login:
Toggle this option to require users to be logged in to use ChatGPT. This adds an additional layer of security by ensuring that only authenticated users can interact with the AI. - API Endpoint:
- Choose between two available endpoints:
- OpenAI: Use OpenAI’s official API for standard AI integration.
- Yescale: Select this endpoint for a custom API setup or alternative service provider.
- Ensure that you choose the appropriate endpoint based on your API Key.
- Choose between two available endpoints:
- API Key:
Enter the API key that connects your ChatGPT service. This key is essential for enabling ChatGPT features and should be kept confidential. It allows the theme to connect and interact with OpenAI’s servers. Make sure to choose the correct API Key based on your selected API Endpoint. - Chatbot Model:
Select the AI model to define how powerful and responsive the chatbot is:- GPT-3.5 Turbo: A faster, more cost-effective model suitable for most general purposes.
- GPT-4o: The more advanced model, offering better comprehension and nuanced responses. Use this for more complex tasks or when a higher level of AI understanding is needed.
- Temperature:
Adjust the temperature to control how creative the AI responses are. A higher value (up to 1) results in more creative and diverse responses, while a lower value (e.g., 0.3) will make responses more focused and deterministic. The recommended value is 0.7. - Max Response Tokens:
Set the maximum number of tokens (or words) ChatGPT can generate in one response. A higher limit allows more detailed responses, while a lower limit keeps responses concise. - Message Limit:
Define the number of messages you can send is limited within the reset time period. Set to 0 for unlimited messages. - Limit Reset Time (Minutes):
This setting controls how often the message limit resets. For instance, if set to 1 minute, users can send a defined number of messages every minute. Ignored if “Message Limit” is set to 0 - Conversation Memory:
Enable this option to allow ChatGPT to remember the context of a conversation. This improves the flow and relevance of responses over multiple interactions.
– Note: When this option is enabled, more tokens will be sent each time you send a message, which may result in increased costs. - Welcome Message:
Customize the message that is displayed to users when they first interact with ChatGPT. You can leave this field blank to use the default message.
Backup and Restore
The backup and restore feature lets you save your current settings or import existing configurations.
- Backup: Copy the content from the text box to save your current settings.
- Restore: Paste previously saved configurations to quickly restore settings.
Usage Guidelines
- Accessing the ChatGPT Widget:
Once the settings are configured, users can interact with ChatGPT through the chat box on your website. - Managing Conversations:
Users will receive responses based on the configured model, temperature, and message limits. The conversation memory ensures that ChatGPT provides contextually aware responses across multiple messages. - Troubleshooting:
If ChatGPT is not responding correctly, double-check your API Key, endpoint, and model settings. Also, ensure that your internet connection is stable and the API service is not experiencing downtime.
By following this documentation, you can easily set up and manage the ChatGPT integration on your WordPress site.