This section allows you to manage and display Google AdSense ads on your website. You can configure multiple ads and easily embed them using automatically generated shortcodes. Here’s how the settings work:
-
Adsense Code
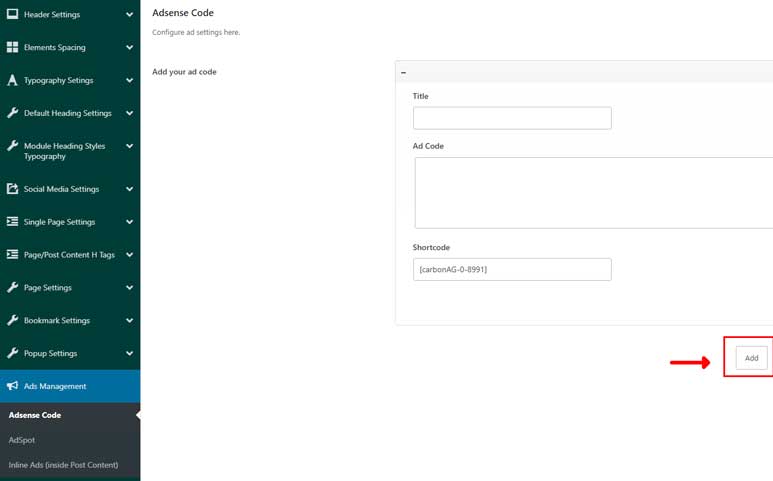
In this tab, you can set up the AdSense ads for your website. When you create an ad, a shortcode is automatically generated, which can be used to display the ad anywhere on your site. By default, the settings include one ad, but you can add more as needed.
Fields for Each Ad:
- Title: Give your ad a title for easy identification.
- Ad Code: Insert your AdSense code here.
- Shortcode: This shortcode is automatically generated by the theme. Use it to display the ad on your site.
-
AdSpot Settings
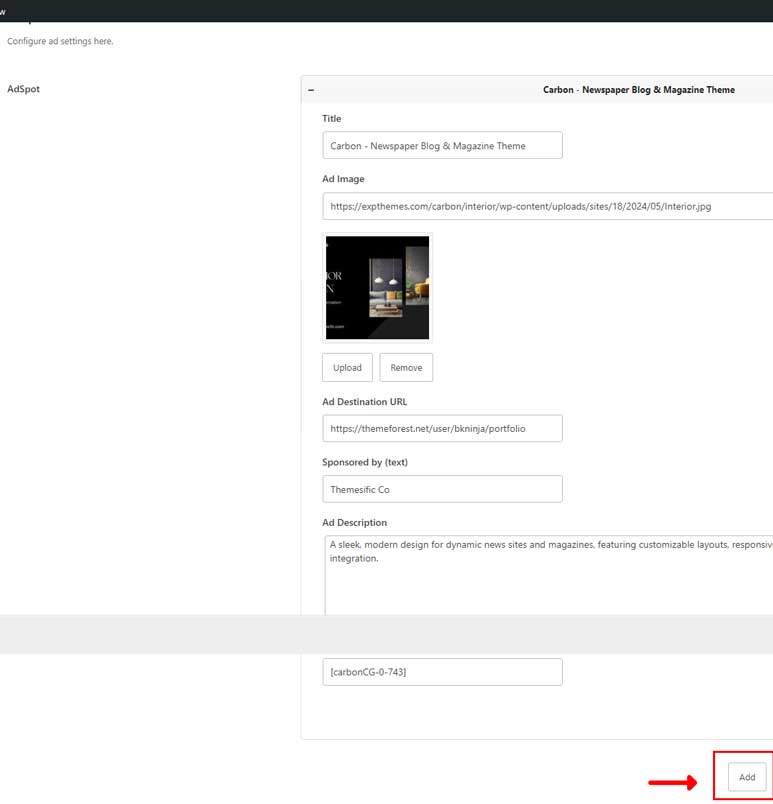
In addition to Google AdSense, the theme provides a flexible AdSpot feature, allowing you to manage and display custom ads with images, links, and descriptions. Each AdSpot is configured in a similar way to AdSense, with the ability to generate a shortcode for easy placement across your website.
Fields for Each AdSpot:
- Title: Provide a title for your AdSpot for easy identification.
- Ad Image: Upload the image you want to use for the ad.
- Ad Destination URL: Set the URL where users will be directed when they click the ad.
- Sponsored by: Add a text label to show who the ad is sponsored by (optional).
- Ad Description: Add a brief description or promotional text for the ad.
- Shortcode: This shortcode is automatically generated by the theme. Use it to display the ad on your site.
-
Inline Ads Settings (Display Inside Post Content)
The Inline Ads Settings allow you to display ads directly within your post content at specified paragraph positions. There are two types of ads: Image Ads and Google AdSense Ads. These ads can be targeted to specific posts or displayed across all posts.
1. Ad Image
This option allows you to display an image-based ad within your post content.
Fields for Ad Image:
- Ad Image: Upload the image you want to use for the ad.
- Ad URL: Set the URL where users will be directed when they click the ad.
- Ad Place: Specify the paragraph number where the ad should be inserted. For example, setting it to 3 will display the ad after the third paragraph. Set it to 0 to disable this ad.
- Insert to Post IDs: Specify the post IDs where this ad should be displayed. Separate multiple IDs with a comma (e.g.,
12, 8, 30, 42). You can also type “All” to display this ad across all posts.
2. Google AdSense Ad
This option allows you to display Google AdSense ads within your post content.
Fields for AdSense Ad:
- Adsense Ad Code: Paste the Google AdSense code for the ad.
- Ad Place: Specify the paragraph number where the ad should be inserted. For example, setting it to 3 will display the ad after the third paragraph. Set it to 0 to disable this ad.
- Insert to Post IDs: Specify the post IDs where this ad should be displayed. Separate multiple IDs with a comma (e.g.,
12, 8, 30, 42). You can also type “All” to display this ad across all posts.
Adding and Managing Inline Ads
You can add multiple ads of either type by following the same process. Each ad can be configured individually to control its placement and targeting within your posts.
This setup ensures that you can strategically place ads within your content, either based on specific post IDs or across all posts, optimizing the user experience and ad performance.